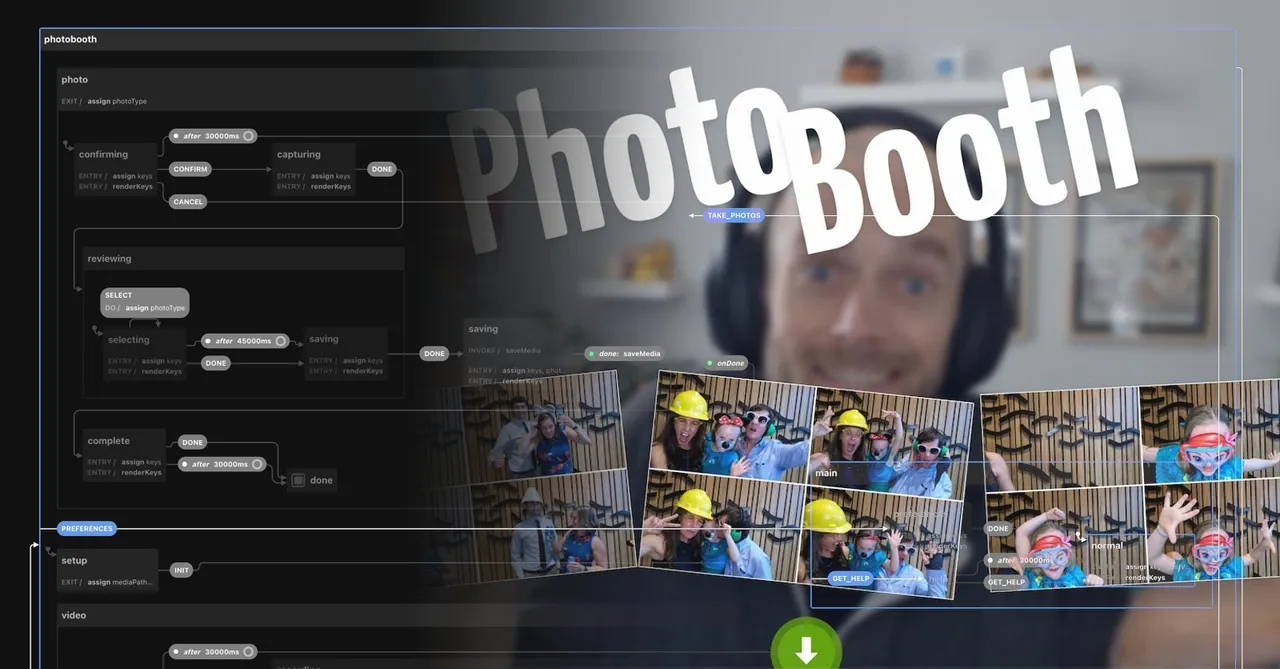
Previously, I wrote about how I created a DIY Photobooth for my wedding reception and the results were amazing. Now we can get to the choices, technical details, and hurdles I went through writing the Photo Booth application. You might consider this a post-mortem tech design.
High-level plan
My general plan was to create a full DIY photo booth for my wedding and spend as little money as possible. The photo booth would need the following features:
- Take a number of photos in succession and stitch them together as a collage.
- Upload the final photo collages to a Firebase storage bucket immediately after creation.
- Record video messages, up to 30 seconds, as an alternative to a guest book.
- Be easy to use: both cognitively and physically.
Design choices
Electron application
Most software developers would instantly judge that a native application would be the best choice to build a Photo Booth. And really, they’re probably right. A native application would likely give the speed and stability you want from something incredibly interactive that that needs to work with large images and videos.
That being said, I decided to use Electron for two reasons:
- I didn’t have the time to spend re-learning native app development.
- I really wanted to have a reason to learn and use the
MediaStream&MediaRecorderweb APIs andx-stateas a full-blown state-machine.
So, while Electron is not the best choice, it’s still a choice that worked and there’s nothing wrong with that.
Webcam
In a best-case scenario, I would hook up a DSLR camera through an HDMI capture card and run it as a webcam to get the best quality images out of any photo taken through the MediaStream API. Unfortunately, I didn’t want to jump into buying an HDMI capture card and I also wanted to keep my DSLR handy for other purposes. Otherwise, I’d need to buy both another DSLR and capture card. That would quickly blow up the budget (and then some) on this project.
So we’re stuck using a webcams, but unfortunately, webcams are notoriously crappy. Most are 720p and the ones that say they are 1080p have poor sensors that don’t process light well and make your images come out pretty grainy. Even the “top end” webcams are not without their issues.
However, GoPros can also be used as webcams now, given that you have the GoPro Webcam app installed. Well guess what, I just happen to have a GoPro Hero 10 that can do this.
While still running at a maximum of 1080p, the images from the GoPro over the MediaStream API come out crisp, clear, bright, and all-around better than good enough!
User interaction
Assuming I would not have access to a large touch-screen, I already owned an Elgato Stream Deck Mini. I could use the 6 buttons on here as an interactive user interface for navigating menus and options.
Execution
Electron
Finding the right path to get started with Electron using modern Javascript (or TypeScript) and frameworks that require build tooling took longer than I would have liked. Similar to trying to figure out what is needed to just set up a website built with JS these days, Electron was just as bad or worse.
I stepped in thinking it would just be built-in that webpack would build my application with some useful defaults. Unfortunately, there really isn’t any build tooling to be found out of the box other than compiling to a runnable application.
I first tried electron-vite, wanting the new hotness of building esmodules, thinking it’d make things faster to iterate. Unfortunately, I quickly hit the limitations of that when pulling in the @elgato-stream-deck/node package, as it requires linking to a native dependency, which I couldn’t figure out how to do with Vite, but am well familiar with it in webpack. (If anyone knows, please reach out and point me in the right direction!)
So after attempting to set up a bunch of inter-connected webpack processes myself, I thankfully gave up and replaced everything with Electron Forge. This simplified the whole setup process, allowed me to hook into the webpack module rules and add the node-loader.
After that, most of the Electron setup is pretty run-of-the-mill stuff. I tried to follow best-practices for inter-process communication between node and the client, as well as only allowing the ability to load and save to directories with the correct permissions.
My biggest criticism for Electron is that there is far too much outdate information around the web on how to do the more detailed bits with security, best practices, and even event listeners. The documentation is pretty good, but naming conventions don’t always match what I would expect, coming frmo a Node.js server and JavaScript client background.
State machine
Given the complexity of managing state across two user interfaces, the screen and the StreamDeck Mini, I wanted to ensure that both were in sync at all times. To do this, I chose to build a full state machine (main/src/state/machine.ts) using x-state, run by the Electron Node.js process.
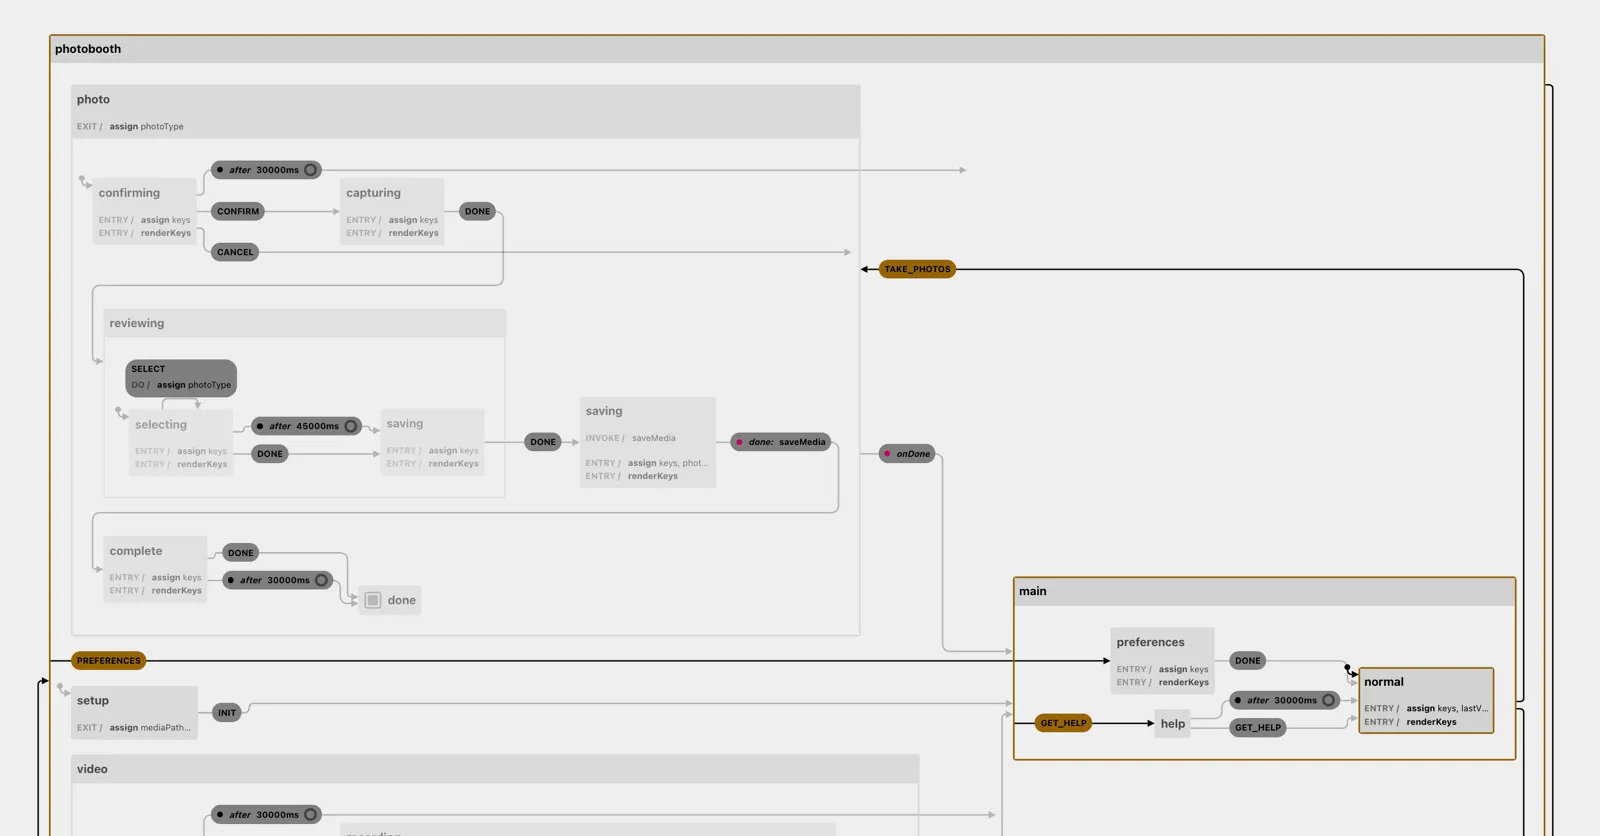
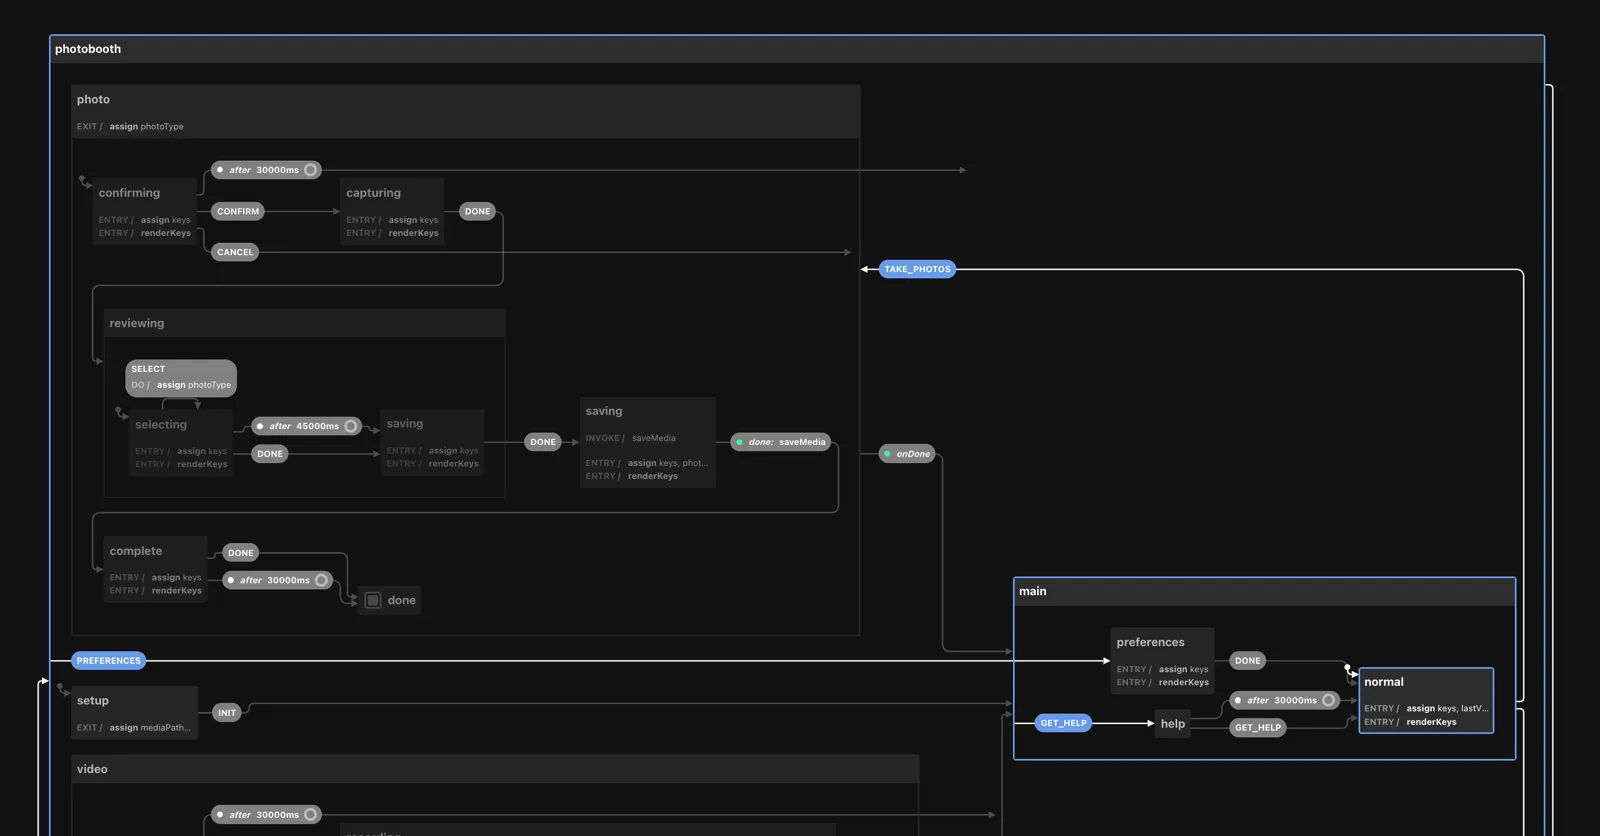
Check out the interactive version of the Photo Booth state machine on the Stately visualizer.
This machine handles the entire state of the application: backend, frontend (GUI), and other frontend (Stream Deck). When entering any state, we assign an array of possible keys and their transition type to the machine’s context, then call the renderKeys action.
Communicating between the main and renderer process
Sending messages back and forth between the two processes is crucial for most Electron applications, since they run in separate sandboxed processes.
const service = interpret(machine);service.start();
service.onTransition((state) => {  const { streamdeck, ...meta } = state.context;  webContents.send('transition', { value: state.toStrings(), meta } as TransitionData);});
ipcMain.on('transition', (event, action) => {  service.send(action);});
Let’s look at what happens when taking our four photos has completed and we want to prompt the participants to select a layout for their collage. We have four layouts to choose from, so we render those to the first four buttons, then we want our “Done” action as the last, bottom-right action. So we set up our entry assign handler to assign the keys and actions:
// State snippet: photo.reviewing.selecting{ selecting: { entry: [ assign({ keys: () => [ { key: 'quad', type: 'SELECT' }, { key: 'quadtych', type: 'SELECT' }, { key: 'collage', type: 'SELECT' }, { key: 'random', type: 'SELECT' }, null, { key: 'done', type: 'DONE', description: 'Save your collage' }, ], }), 'renderKeys', ], },}Then our renderKeys action is immediately fired and renders the defined images to each key, clearing out null (blank) keys along the way.
{  actions: {    renderKeys: async (context) => {      const { keys, streamdeck } = context;
      for (let i = 0; i < keys.length; i++) {        const { key } = keys[i] || {};        if (!key) {          streamdeck.clearKey(i);          continue;        }
        streamdeck.fillKeyBuffer(i, images[key]);      }    },  }}
One small design choice: It was inefficient to send the entire Stream Deck object into the state machine’s context and didn’t mesh well with normal patterns in x-state. However, not passing the entire Stream Deck object to the state machine’s context required a bit of digging into the state’s key context to send the correct action back into the service. Turns out that this really wasn’t too bad.
streamdeck.on('up', (keyIndex: number) => { const action = service.state.context.keys[keyIndex]; if (!action) { return; } service.send(action);});Syncing state between main and renderer process
On each state transition, we also pass the state context to the renderer application and use a custom useLocation() hook to merge the state machine’s context into the React Router Location state. This then lets us extract out each key and render it to a <HelpCard /> on screen.
Since the routing and location needed to be determined by the state machine that’s run in the main node.js process, I added a new faux-context wrapper NavigationProvider, that listens to the transition event passed to the renderer process, and calls React Router’s navigate() function.
import { useLocation as useRRLocation, useNavigate } from 'react-router-dom';
export function NavigationProvider({ children }: { children: React.ReactNode }) {  const navigate = useNavigate();
  React.useEffect(() => {    const remove = window.api.addListener('transition', ({ value, meta }) => {      navigate(        {          // Important: need to convert x-state value from an array/dot-notation to URL-compatible paths          // eg. ['photo', 'capturing', 'photo.capturing'] -> /photo/capturing          pathname: `/${value[value.length - 1].replace(/\./g, '/')}`,        },        { state: meta },      );    });
    return remove;  }, []);
  return <>{children}</>;}
Then, in order to ensure that our state object always reported to Typescript with the correct shape, I needed a custom useLocation() hook that forced the type.
import type { TransitionData } from '@pb/main';
export function useLocation() {  const { state, ...location } = useRRLocation();  return { state: state as TransitionData['meta'], ...location };}
User interface
I left this detail out of the plan, because I didn’t care too much about what I ended up going with. I picked React and Tailwindcss, as I figured that’d be the least overhead in terms of familiarity – I wouldn’t need to learn something new here.
Animation
In the initial working iterations, the application still felt a bit too much like it was meant to be a web application, not eagerly loading the next view and not able to smoothly transition from one state to another. I decided that this was jarring in practice, so I explored how I could make everything feel like it was flowing, fun, and more like a “native” application.
Given that I was using Tailwindcss, CSSTransition from React Transition Group came through as an obvious choice. With it, you can easily add and remove CSS classes for various states of transitioning from one state to another. The hard part came in hooking this into react-router in order to transition from one view to another via animating the different parts of the screen.
After a bunch of trial and error, the key was to forego using react-router’s Routes (v6+) or Switch (v5) in favor of my own implementation that could pass the transition state down through to each view. This required a few parts:
First, we need a route mapping for all views that will be shown. In order for every view to receive transition state, we cannot use nested routing. So we create a routeMap
const routeMap: Record<string, React.FunctionComponent<Props>> = {  '/photo/confirming': PhotoConfirm,  '/photo/capturing': PhotoCapture,  // This state may have multiple sub-states, but they are mostly invisible to the user  '/photo/reviewing/*': PhotoSave,  '/photo/complete': PhotoReview,  '/video/confirming': VideoConfirm,  '/video/recording/readying': Readying,  // This state may have multiple sub-states, but they are mostly invisible to the user  '/video/recording/*': VideoRecord,  '/video/reviewing': VideoReview,  '/main/preferences': Preferences,  '/main/help': MainHelp,  '/main/*': Main,  '/setup': Startup,};
const routes = Object.keys(routeMap).map((path) => ({ path }));
Once that’s set up, we can use the SwitchTransition and CSSTransition components from React Transition Group to handle moving from one route to another
import { HashRouter, matchRoutes } from 'react-router-dom';import { CSSTransition, SwitchTransition } from 'react-transition-group';import { useLocation } from './context';
function Router() {  const location = useLocation();
  const match = React.useMemo(() => {    const matched = matchRoutes(routes, location);    return !matched ? null : matched[0].route;  }, [location]);
  return (    <SwitchTransition>      <CSSTransition        // ensuring match.path here should not be necessary if we had a better guarantee        // that every route would be accounted for        timeout={match?.path ? 250 : 0}        key={match?.path || ''}      >        {(status) => {          // Again, just in-case, so we don't crash during development          if (!match || !match.path) {            return null;          }          const Component = routeMap[match.path];          // Important! The CSS Transition status gets sent through to be handled by          // each individual View, since all may have their own layout and components          // needing specific animations          return <Component status={status} />;        }}      </CSSTransition>    </SwitchTransition>  );}
Okay, that was a bit of setup, but not too bad. Now, for the payoff, each route’s view can accept the status property and add CSS classes for each possible transition status:
import clsx from 'clsx';
export function ExampleView({ status }: Props) {  return (    <div      className={clsx({        'opacity-0': status === 'entering' || status === 'exited' || status === 'unmounted',        'transition-all ease-out opacity-1': status === 'entered',        'transition-all ease-in opacity-0': status === 'exiting',      })}    >      {/* content to fade in/out */}    </div>  );}
In use, that became cumbersome to remember, so I ended up creating a transition() function helper. This made it easy to reuse transitions across different views and components.
import { transition } from '../modules/transition';
export function ExampleView({ status }: Props) {  return (    <div className={clsx('...', status ? transition(status, 'slideUp') : undefined)}>      {/* content to slide up when entering and down when exiting */}    </div>  );}
Last minute additions
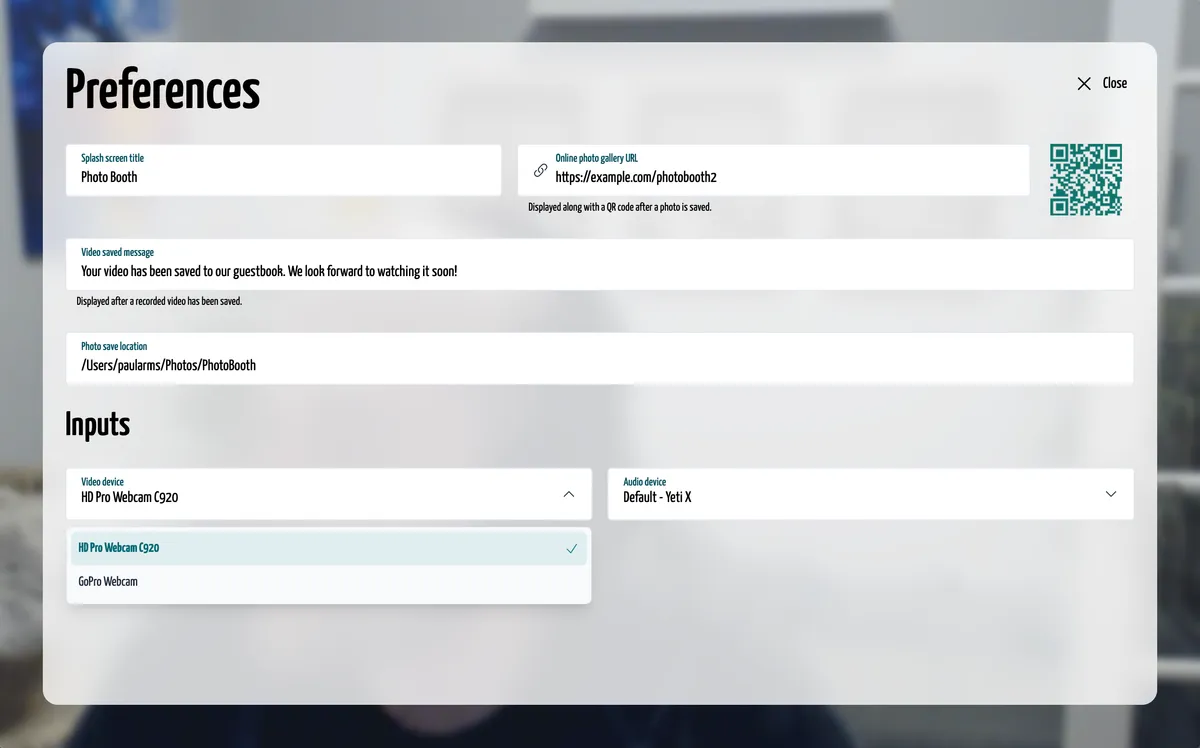
After confirming that the GoPro worked as a webcam, I didn’t really leave it set up to run all of the time during development, as it was just a bit too much to have hanging around. What I didn’t realize though was that if you had multiple cameras available, eg: a laptop with a built-in camera, the GoPro would never be chosen as the default camera.
I quickly needed to add preferences to the application, so I threw together a few settings that would probably make it helpful if anyone else ever wanted to pick up the source code and repurpose it for their own party.
Result
I’m super happy with the end result. There isn’t much more to say other than it worked and it worked well – just as well as a $1,500 rental would have.
So here’s me messing around with it at home and trying to get Milo to pose with me.
What went wrong
Open GoPro API
GoPro has an API called Open GoPro. It’s a fully documented API spec to control their cameras over Bluetooth LE, WiFi, and USB1.
Unfortunately, after buying a brand new GoPro Hero 10 ($350) and spending at least 30 hours with the API over USB, I had to throw out the idea of using the API. The fact of it is that GoPro cameras are just very slow at taking photos and being ready to take another photo. Probably fine out in the wild, since the cameras are rarely used for photos – typically just action video, but in a setting where timing and speed are key, controlling the camera with the API was just an absolute failure.
GoPro overheating
Originally, I had bought a USB passthrough door for the battery cover. I took the battery out in hopes that it would both not drain on the battery and not overheat. Well, turns out that the door and lack of battery increased the heat of the GoPro and it ended up overheating. Thankfully, this was during our family dinner the night before the wedding. I set up the “Memory Shack” in our living room so that we could have a full test-run with it. Everything was great until I noticed that the video was really distorted, pointed downward, despite the camera being completely upright.
A very weird experience for sure. I took off the passthrough door and just left the unit completely open. This allowed enough air to fully flow in and out of the device, fixing the overheating problem.
WiFi restrictions
I wrote a separate script to watch the folder that photos were saved into and automatically resize, compress, and upload to Firebase storage and add into the wedding website. This worked great during the test run, but turns out our venue’s wifi had some weird network restrictions running and no photos uploaded. It was a bummer that no one was able to download their photos at the event and share, but a quick fix the next morning got all of the photos uploaded to our gallery.
No touch screen
After watching my 10-year-old nephew try to use the Photo Booth with the 6-button Stream Deck Mini, it was instantly obvious that a touch screen would have been the most intuitive choice.
I was thankful that I had covered the borrowed screen with a thin acrylic sheet, lest his finger jabbing go right through the screen.
While the Stream Deck Mini worked well and people figured out the buttons quickly, it still required a learning moment that I would have loved to remove.
Cost breakdown
| What | Cost | Actual cost |
|---|---|---|
| Elgato Stream Deck Mini | owned | $80 |
| Portable USB-C screen | borrowed | $190 |
| GoPro Hero 10 | owned | $350 |
| 12” LED ring light | $40 | $40 |
| Wood & supplies for structure | gifted | ? |
| Acrylic sheet to cover the screen | $16 | $16 |
| Total | $56 | at least $676 |
So, given the cost breakdown, I like to tell myself that I only spent about $60 on the entire photo booth – and even if I count every piece of hardware (less the actual computer that has to run the app), I would still be spending about $1,000 less than if I had rented a Photo Booth.
However, if you count how my time is worth money as well, I probably spent at least 100 hours in total across software and physical structure building – maybe more. I don’t even want to try calculating a dollar amount on this.
I like to keep in mind that the time spent was also an investment into my own skills. I can now say that I’ve gone through building at least a decent piece of software using Electron, dug pretty deep into proper state machines, and become intimately familiar with the web Media APIs.
Footnotes
-
Some protocols for the Open GoPro API are more comprehensive and stable than others. In my testing, USB was the most stable, but still fell short due to timing issues. ↩